In order to run a .hex file you don’t need to install Eclipse or any of that crap.  You just need to install the “flasher”, erase the memory, and then flash the test program.

Flashing test program #1

  1. Go to the TESTING directory
  2. If you don’t have it installed already, download and install JFlashLite_V485a.zip
  3. Download the test program Blinky32k_C_nRF51822.hex
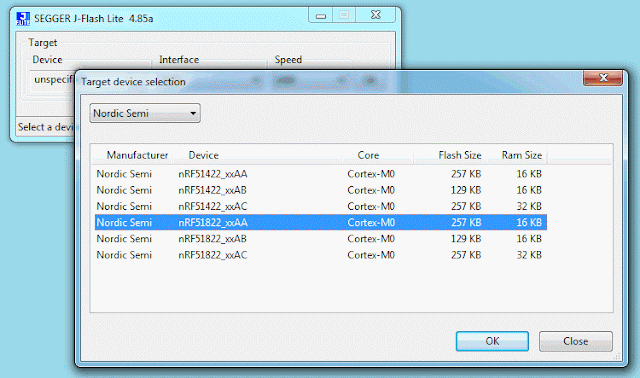
  4. The UI to JFlashLite is tedious but easy.  
  5. Make sure to specify the correct processor using the pull-down menu. nRF51822_xxAA

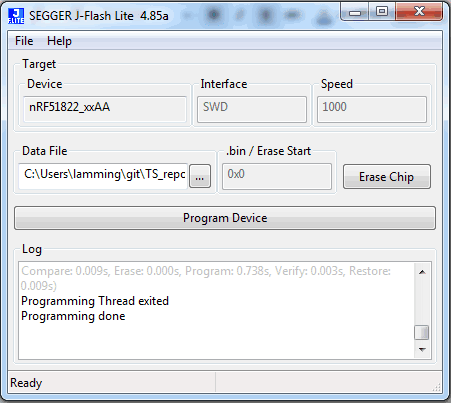
  6. Erase the memory first time around.
  7. Set the “Data file” field to point at the test program .hex file
  8. Press “Program Device”
  9. After the flashing process, the program might not start automatically (probably because there is a fossil breakpoint at “main”).  If it doesn’t start, then power-cycle the board. 

    while (true)
    {
     LED_clearAll();
     nrf_delay_ms(500);
     LED_setAll();
     nrf_delay_ms(500);
     LED_clearAll();
     for (int i = 0; i < LEDS_NUMBER; i++)
        {
            LEDS_INVERT(1 << leds[i]);
            nrf_delay_ms(500);
        }
    }

    Test program #2

    1. Plug the USB port into the PC – a new COM port should be created
    2. Open your favorite terminal-emulator (e.g. Putty?)
    3. Set 38400, 8, 1, parity:none, flow-control:none
    4. Download and flash the test program Blinky32K_USB_C_nRF51822.hex

        while (true)
        {
        LED_clearAll();
        nrf_delay_ms(500);
        LED_setAll();
        nrf_delay_ms(500);
        LED_clearAll();
        for (int i = 0; i < LEDS_NUMBER; i++)
            {
                LEDS_INVERT(1 << leds[i]);
                nrf_delay_ms(500);
            }
    ts_uart_init();
    TS_TRACE(“rn———–rn%s HW:%s SM:%s SW:%s(%s %s)rn”,
    MANUFACTURER_NAME, DEVICE_NAME, SDNAME, SERVICE_NAME, __DATE__,
    __TIME__);
        }

    JFlash Log

    Here is what the jFlash log looks like when it downloads to the TS06.2
    Erasing nRF51822_xxAA via SWD-Interface@1000kHz 
    Erase Thread started.
    Device “NRF51822_XXAA” selected.
    Found SWD-DP with ID 0x0BB11477
    Found Cortex-M0 r0p0, Little endian.
    FPUnit: 4 code (BP) slots and 0 literal slots
    CoreSight components:
    ROMTbl 0 @ F0000000
    ROMTbl 0 [0]: F00FF000, CID: B105100D, PID: 000BB471 ROM Table
    ROMTbl 1 @ E00FF000
    ROMTbl 1 [0]: FFF0F000, CID: B105E00D, PID: 000BB008 SCS
    ROMTbl 1 [1]: FFF02000, CID: B105E00D, PID: 000BB00A DWT
    ROMTbl 1 [2]: FFF03000, CID: B105E00D, PID: 000BB00B FPB
    ROMTbl 0 [1]: 00002000, CID: B105900D, PID: 000BB9A3 ???
    Debugger initialized successfully.
    J-Link: Flash download: Total time needed: 5.550s (Prepare: 0.103s, Compare: 0.000s, Erase: 5.440s, Program: 0.000s, Verify: 0.000s, Restore: 0.007s)
    Erase Thread exited 
    Erase done

    Downloading C:UserslamminggitTS_repoBlinky_C_nRF51822NOSD_TS06.2Blinky_C_nRF51822.hex to nRF51822_xxAA via SWD-Interface@1000kHz 
    Programming Thread started.
    Device “NRF51822_XXAA” selected.
    Found SWD-DP with ID 0x0BB11477
    Found Cortex-M0 r0p0, Little endian.
    FPUnit: 4 code (BP) slots and 0 literal slots
    CoreSight components:
    ROMTbl 0 @ F0000000
    ROMTbl 0 [0]: F00FF000, CID: B105100D, PID: 000BB471 ROM Table
    ROMTbl 1 @ E00FF000
    ROMTbl 1 [0]: FFF0F000, CID: B105E00D, PID: 000BB008 SCS
    ROMTbl 1 [1]: FFF02000, CID: B105E00D, PID: 000BB00A DWT
    ROMTbl 1 [2]: FFF03000, CID: B105E00D, PID: 000BB00B FPB
    ROMTbl 0 [1]: 00002000, CID: B105900D, PID: 000BB9A3 ???
    Debugger initialized successfully.
    J-Link: Flash download: Flash programming performed for 1 range (39936 bytes)
    J-Link: Flash download: Total time needed: 0.870s (Prepare: 0.108s, Compare: 0.008s, Erase: 0.000s, Program: 0.741s, Verify: 0.002s, Restore: 0.009s)
    Programming Thread exited 
    Programming done

    Troubleshooting

    If the new module won’t erase, or flash correctly then it may be that the memory is protected.  Here is how to remove that protection.

    I put a zipped directory called nrfjprog.zip out in the usual place.
    Inside is a “bin” directory.
    Copy that directory somewhere – your desktop for example.
    Open a command window on the bin directory.
    Type the command nrfjprog -e
    Inline image 1

    Then try erasing and flashing again using jflash

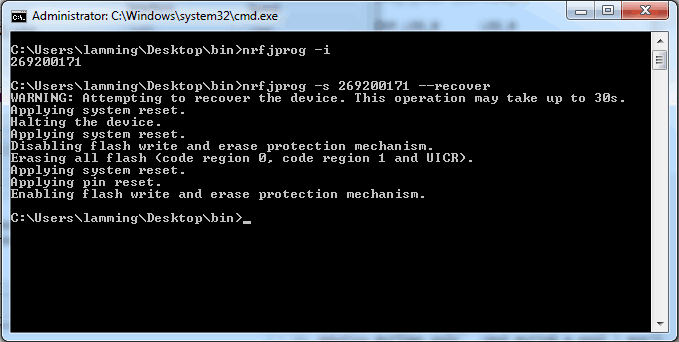
    If that doesn’t work, then do the following:

    1. Get the serial number of your jLink, e.g.
      >nrfjprog -i269200171

      It should match the number printed on the label on the back of your jLink box.

    2. Reset everything
      > nrfjprog -s <jLinkSN> –recover

    Leave a Reply